Install OS
To use the KNEO Pi, you will need an operating system. KNEO Pi checks for an operating system on any SD card inserted in the SD card slot. To install an operating system on a microSD card for KNEO Pi, you will need:
- a computer to write an image to the microSD card into a bootable device
- a way to plug the microSD card into that computer
This document is used for starting up KNEO Pi via a defined image file with KNEO Pi OS.
Prepare the microSD card
For Windows users, the following steps will guide you through the process using a tool called Win32DiskImager.
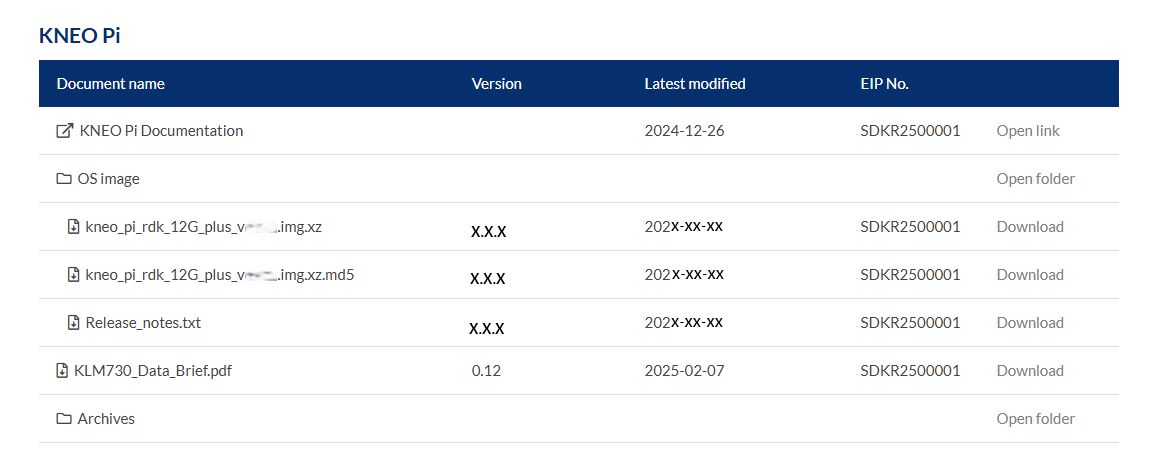
1. Download the Image File
Visit Kneron Developer Center and download the pre-defined OS image file. Find the file named kneo_pi_hdk_12G_{version}.img.xz under the KNEO Pi section. Also, release_notes.txt is maintained to document the history of changes. After the download is complete, locate the downloaded file on your computer. It should have the .xz extension, meaning it is compressed.
How to Use MD5 Checksums to Verify the Downloaded File?
(Optional) - To ensure the integrity of your downloaded file, follow these steps to verify it with the provided .md5 file:
- Place the downloaded image file and its corresponding .md5 file in the same directory.
-
On a linux-like system, run the following command in a terminal to compare the MD5 checksums.
Check the output:- If the download is valid, you will see a message like:
kneo_pi_hdk_12G_{version}.img.xz: OK.
- If the download is valid, you will see a message like:
-
On a windows system, run the following command in powershell terminal
Check the output:Get-FileHash -Path "kneo_pi_hdk_12G_{version}.img.xz" -Algorithm MD5 | ForEach-Object { $_.Hash -eq (Get-Content "kneo_pi_hdk_12G_{version}.img.xz.md5").Split()[0] }- If the download is valid, you will see
True
- If the download is valid, you will see
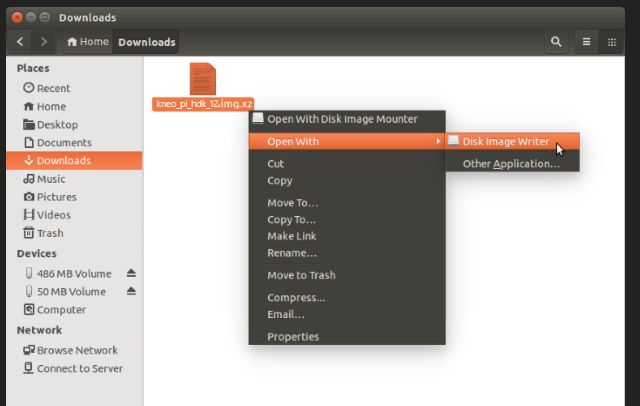
2. Writing an SD Card Image Using Ubuntu Disk Image Writer
Alternative Ways - Using Raspberry Pi Imager (Windows/Linux/MacOS)
- Download the latest version from https://raspberrypi.com/software/ and run the installer.
- The information below is based on Raspberry Pi Imager v2.0.0.
- Launch the application by clicking the Raspberry Pi Imager icon.
- In the Device tab, select No filtering from the list. Select NEXT.
- In the OS tab, select the Use Custom option and specify the image file(.xz). Select NEXT.
- In the Storage tab, select the storage device to write the image to. Select NEXT.
- In the Writing tab, confirm the summary information and then select WRITE.
- Acknowledge the warning message by selecting I UNDERSTAND, ERASE AND WRITE.
- Imager begins writing your image to the storage media.
- After the image is written and verified, Imager shows the Done tab. Select Finish to exit Imager.
Alternative Ways - Using Win32DiskImager (Windows)
-
Right-click on the
.xzfile and select Extract from the context menu.
After extraction, you should see a new file namedxxx.img, which is the uncompressed image file that we will use. -
Download the latest version from Win32DiskImager website and run the installer.
- Launch the application by double-clicking its icon on the desktop or finding it in the Start Menu.
- Connect a microSD card into your computer's card reader. Ensure the card is properly connected and recognized by your system.
-
Write the Image to the microSD Card. In the Win32DiskImager window:
- Select the image file by clicking the folder icon next to the Image File field, then navigate to the location where you extracted
.imgfile, and select it. - Choose the device: In the Device dropdown menu, select the drive corresponding to your microSD card. Be very careful to select the correct drive, as writing the image will overwrite any data on that drive.
- Double-check that the correct image file and microSD card are selected, then click the Write button.
- A confirmation dialog will appear, warning that all data on the selected drive will be erased. Click Yes to proceed.
- When the message "Write Successful" appears, it means your image has been completely written.
- You can now safely eject the microSD card from your computer.
- Select the image file by clicking the folder icon next to the Image File field, then navigate to the location where you extracted
- Open up the folder where you downloaded the KNEO Pi image file (.xz file)
- Right-click and select Open with > Disk Image Writer
- Make sure your SD card is plugged in and select it from the Destination list, then click Start Restoring…
- This requires root privileges, so type in your password and click Authenticate
- When it is done, click the eject button and remove the SD Card